How images are made
Draw to Life: A How-To Guide for Turning a Hubble Image into Artwork
Find a hummingbird in a galaxy collision or a starship in the Sombrero. Then pick a free tool and draw it out, step by step.
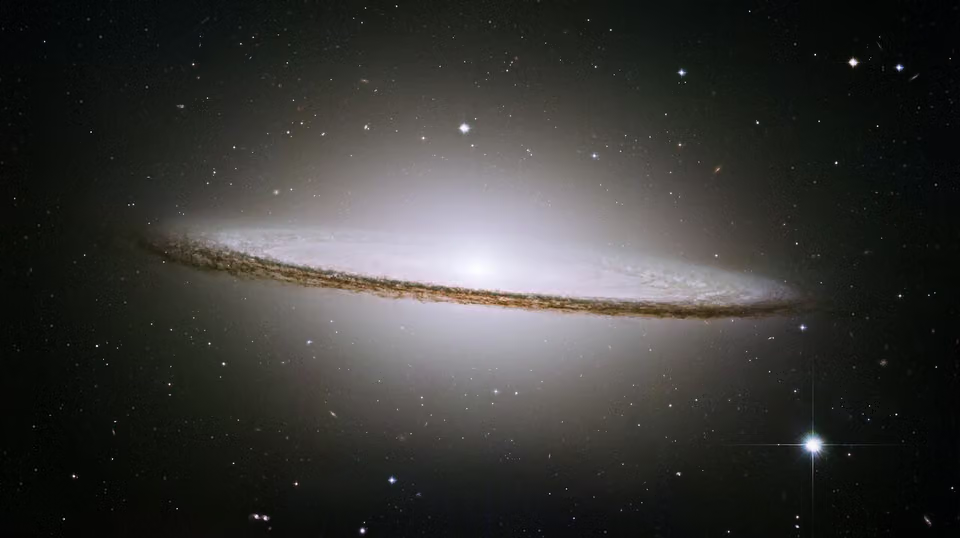
Some Hubble images practically ask to be drawn on. A galaxy seen edge on looks like a flying saucer; a collision between two galaxies looks like a bird snatching food. In the summer of 2019 the Space Telescope Science Institute ran a social media campaign around exactly that idea, the #DrawToLifeChallenge, asking people to transform Hubble pictures into their own creations: animated GIFs, digital paintings, scanned crayon drawings, dot-to-dot outlines. The campaign is over, but the method still makes a good project for a rainy afternoon, a classroom or anyone curious about what is actually in a space picture. This guide walks through it.
Step 1: Find a picture with a hidden shape
Start by browsing. ESA/Hubble's image archive at esahubble.org and NASA's Hubble pages hold thousands of pictures, sorted by type of object. Galaxies, nebulae and star clusters all work; what matters is that something in the image suggests a shape.
Look at each image for a few seconds and ask what it resembles. Then rotate it in your head, or literally, on screen. A galaxy that looks like nothing in one orientation may look like an animal on its side.
Some proven examples:
- The Sombrero Galaxy (M104). Its bright bulge and dark rim of dust already look like a hat, but they can also look like a dish, a disk or the saucer section at the front of a starship.
- NGC 6745. Two galaxies that collided. The larger one, with its bright blue edge, can be read as the head and beak of a hummingbird.
- Mystic Mountain in the Carina Nebula. A pillar of gas and dust with jets streaming from its peaks, full of faces, creatures and towers for anyone who looks for them.

Write down the object's formal name, such as M104 or NGC 6745, as soon as you choose. You will need it later.
Step 2: Choose a tool you already have
You do not need expensive software or a drawing tablet. Pick whichever of these is closest to hand:
- A tablet with a stylus. The built-in gallery or photo editor on many tablets includes pen and markup tools that are enough to sketch on top of an image.
- GIMP. A free, open-source image editor. It can do a great deal if you take time to learn it, and it supports tablets, but a simple sketch is possible with just a laptop trackpad.
- Paint 3D. A simple Windows app. Besides drawing, it lets you copy, paste and rotate parts of a doodle and drop in ready-made 3D stickers.
- Preview. On a Mac, its markup tools allow quick sketching on any image.
- Paper. Print the image, trace over it with pencils or crayons and scan or photograph the result.
Step 3: Download a good copy of the image
Use the largest version you can comfortably work with. On esahubble.org each image page offers several downloads; a large JPEG is usually ideal. Save the file to your device. If you plan to draw on a tablet, send the file to it, by email to yourself, cloud storage or a cable.
While you are on the page, copy the credit line. Every Hubble image carries one, such as "NASA/ESA and The Hubble Heritage Team (STScI/AURA)," and ESA/Hubble states that the full credit must be shown visibly when an image is used.
Step 4: Sketch your idea in a separate layer or copy
Open the image and make a rough outline of what you see. Do not aim for detail yet: a few lines to fix the position of a head, a wing or a hull are enough.
If your tool supports layers (GIMP does), draw on a new transparent layer above the photo, so the original stays untouched and you can switch your drawing on and off. In a simpler tool, work on a copy of the file.
A rough sketch over the Sombrero, for example, might mark where the saucer's rim falls along the dust lane and where the bright bulge could become a dome.
Step 5: Build up the drawing in stages
Once the outline works, add detail and color gradually. Here is a trick that pays off later: each time you finish a stage, save the image as a new, numbered file (sombrero-01, sombrero-02 and so on) before you continue drawing on top of it. Six or eight stages are plenty.
Keep the astronomy visible. The most satisfying results let the real structures show through, so a viewer sees both the drawing and the galaxy, and can tell what in the picture inspired which line.
Step 6: Turn the stages into a GIF
Numbered stages make a stop-motion animation of your drawing taking shape. GIPHY, the free GIF site, has a create tool reached from the top-right corner of its home page. Upload the files in order, set how long each frame shows and add a caption if you like; GIPHY offers a choice of fonts.
A single finished still is just as valid. A quick hummingbird sketch over NGC 6745 made with GIMP and a trackpad can take less than an hour. Another approach uses Paint 3D: doodle dolphins along the arms of a spiral galaxy such as M101, then drop in small 3D fish stickers as extra stars.
Step 7: Share it with the name and credit
When you post your creation, name the object it started from, using its formal designation, and include the image credit. Both small details matter: the name lets others look up the real object, and the credit acknowledges the telescope teams and the public funding behind the data. Mention the tool you used as well; other people will want to try it.

What drawing teaches about the picture
Tracing a Hubble image forces close looking. To place a beak on NGC 6745 you have to find the edge where the smaller galaxy passed; to turn the Sombrero into a starship you follow its dust lane across the disk. Most people notice more in ten minutes of drawing than in an hour of scrolling past. The colors you trace over are themselves a choice made by image processors, explained in Are the Colors Real?, and the galaxy at the top of this page has its own profile in Sombrero Galaxy.
Questions readers ask
Do I need artistic skill to draw on a Hubble image?
No. The image does most of the work, and a few clear lines are enough to reveal the shape you see in it. A simple sketch made with a laptop trackpad in GIMP can be finished in less than an hour, and rough outlines often work better than heavy detail.
Which free software works best for this?
GIMP is the most capable free option and runs on most computers. Paint 3D on Windows is easier for quick doodles and adds copy, paste, rotate and 3D stickers. Preview on a Mac and the markup tools on most tablets are fine for simple sketches. GIPHY turns saved stages into a GIF.
Can I use Hubble images freely?
ESA/Hubble images can be used without a fee as long as the full credit line is shown visibly. The credit is printed on each image's page. For a personal artwork, include it in the post or caption along with the name of the object.
How do I make a GIF of my drawing?
Save the drawing as a separate numbered file after each stage. Then upload the files in order to GIPHY's create tool, set the timing of each frame and add any captions. A short loop of six to eight frames is usually enough to show the drawing growing over the galaxy.